Teamspeak3
Contents
INSTALL INSTRUCTIONS
1. Unzip the teamspeak3 zip file
2. Upload the "addons/teamspeak3" folder to your whmcs install location in the "modules/addons" folder
3. Upload the "server/teamspeak3" folder to your whmcs install location in the "modules/servers" folder
4. Upload the file "includes/hooks/teamspeak3.php" to your whmcs install location in the "includes/hooks/" folder.
ADMIN ADDON SETUP
1. Enable the teamspeak 3 admin addon at "Setup->addon modules"
2. Click on activate link in the teamspeak 3 module
3. Select "Full administrator" access control
ADMIN ADDON SETTINGS
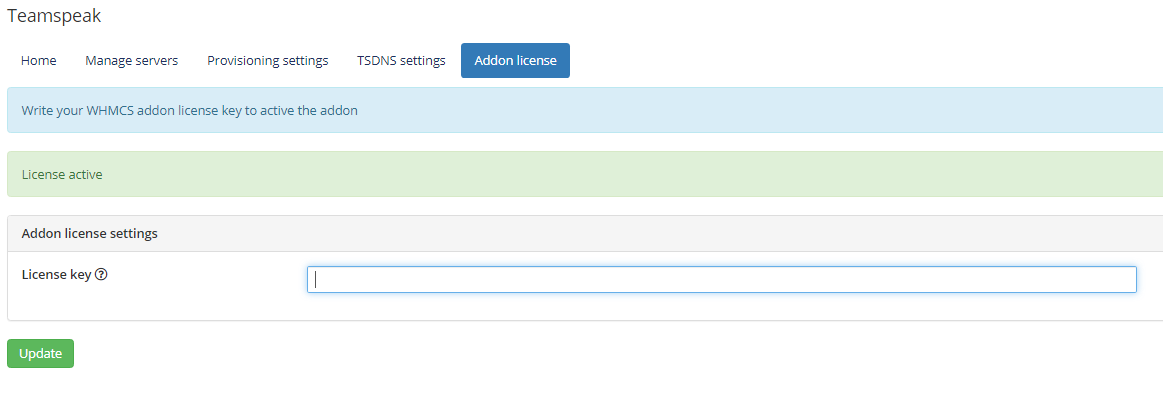
1- Activate your module license in the "License" tab.
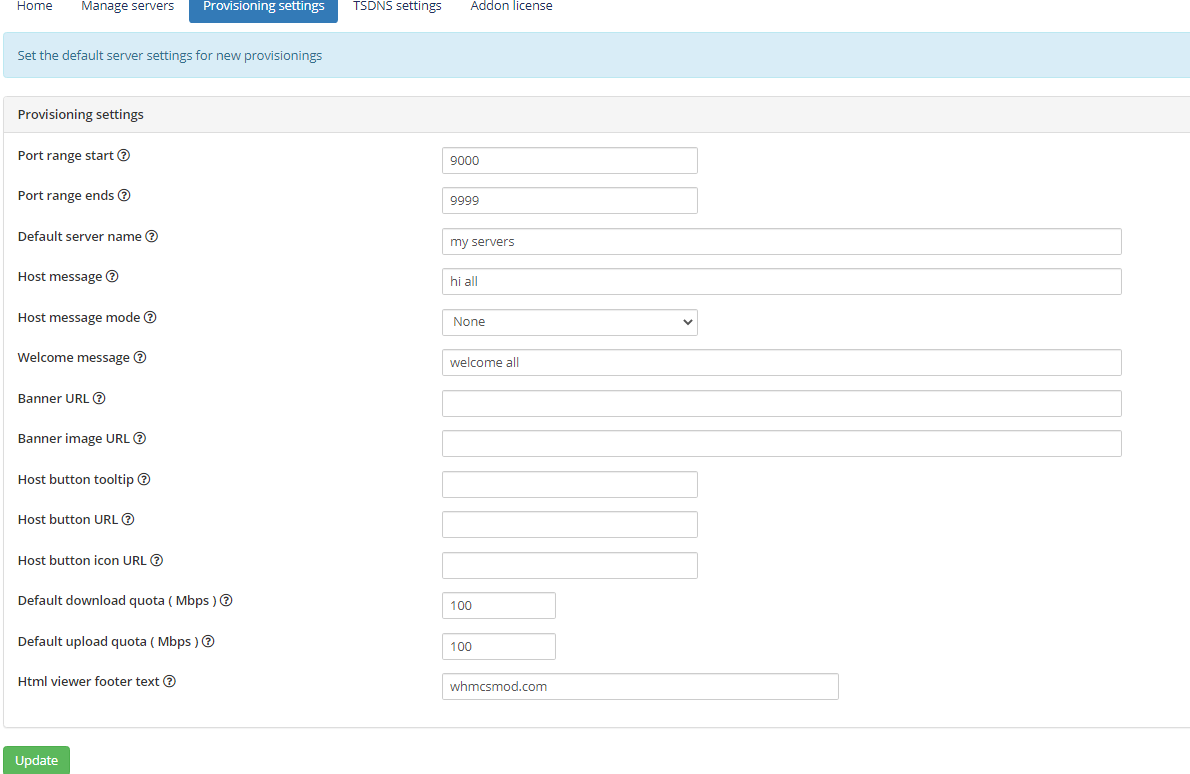
2- Set the default provisioning settings:
- Minimum port ( REQUIRED ): Minimum port range for teamspeak services.
- Maximum port ( REQUIRED ): Maximum port range for teamspeak services.
- Default server name ( OPTIONAL ): Default virtual server name.
- Host message ( OPTIONAL ): Server welcome message
- Host message mode ( OPTIONAL ): Server welcome message type.
- Banner Url ( OPTIONAL ): The image url to be shown in the teamspeak 3 client.
- Banner gfx url ( OPTIONAL ): The image to be shown in your teamspeak 3 client.
- Host button tooltip / url / icon ( OPTIONAL ): The teamspeak 3 client tooltip button settings.
- Default download/upload quota ( OPTIONAL ): The default server file quota size.
- Html viewer footer text ( OPTIONAL ): The text displayed in the HTML teamspeak 3 channel viewer.
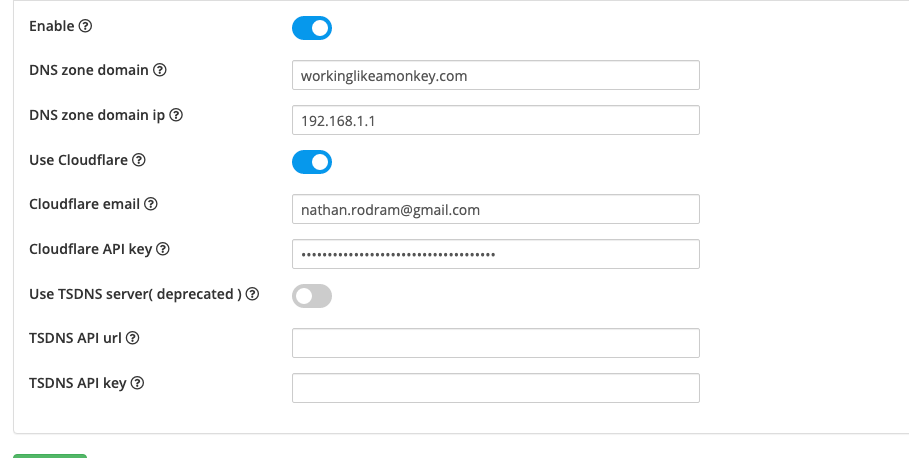
3- Set the TSDNS provisioning settings ( OPTIONAL )
- Enable: Enable/disable TSDNS zone provisioning
- DNS zone domain: Default DNS zone domain
- DNS zone ip: Default DNS zone ip.
- Use Cloudflare: enable Cloudflare DNS provisioning
- Cloudflare email: Your Cloudflare account email
- Cloudflare api key: Your Cloudflare account api key
- Use TSDNS server: Enable eTSDNS server provisioning, deprecated and not supported in future updates.
- TSDNS API url: TSDNS api URL
- TSDNS API key: TSDNS api key
PRODUCT SETUP
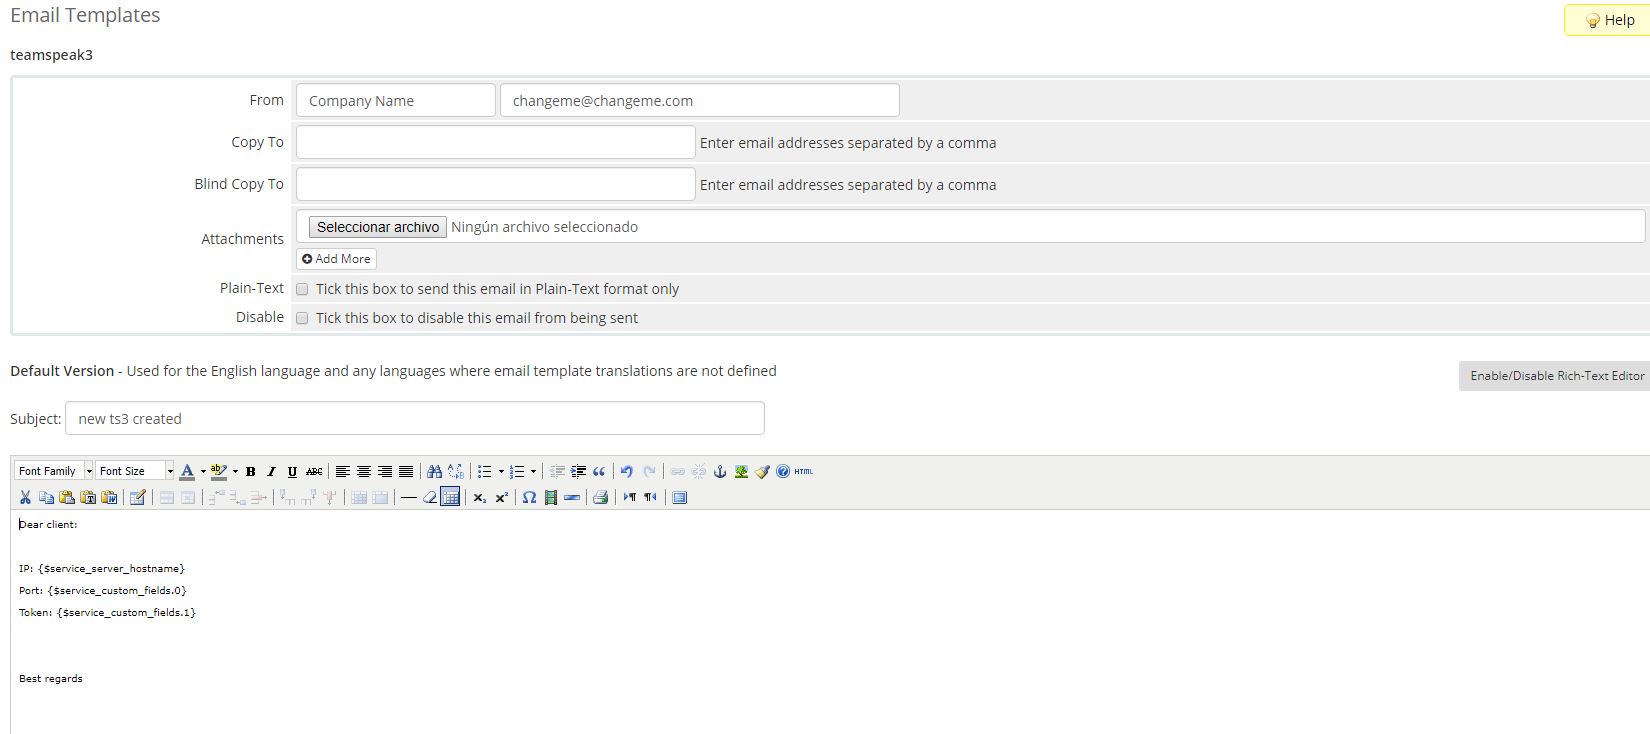
1. Create a welcome email template at "WHMCS->SETUP->EMAIL TEMPLATES"
Type: product
Unique name: teamspeak 3 welcome
Click on create button
Subject: your email subject
Body: Paste the text below
Ip: {$service_server_hostname}
Port: {$service_custom_fields.0}
Token admin: {$service_custom_fields.1}
Click on Save Changes button
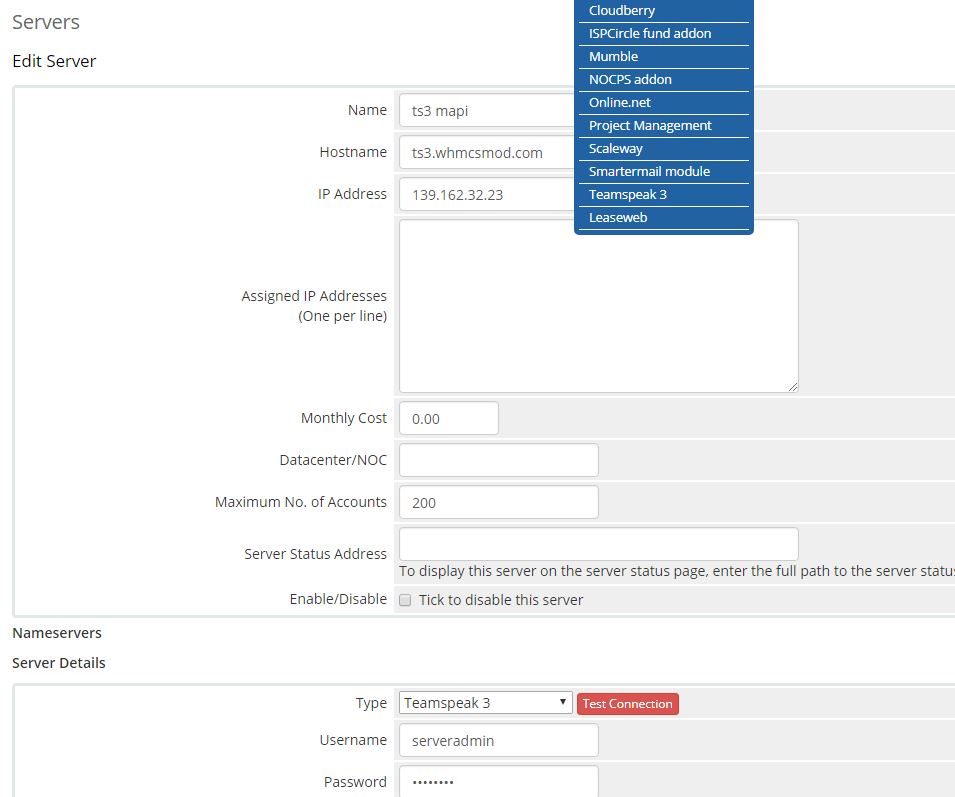
2. Add a teamspeak 3 server:
WHMCS->SETUP->PRODUCTS/SERVICES->SERVERS->Add new server
Name: The server name
Hostname: Your server hostname , used for email templates for example ts3.mydomain.com. If you have TSDNS or cloudflare enabled the hostname MUST exists.
IP: The teamspeak 3 server ip
Type: teamspeak3
Username: The server query admin username ( by default serveradmin)
Password: The server admin query password
click "save"
Note: To test the connection click the "TEST" button. If you get a connection failed, verify that the port 10011 is opened in your whmcs hosting firewall.
3. Create a teamspeak 3 product:
WHMCS->SETUP->PRODUCTS/SERVICES->Create a new product
Details tab:
Product type: other
Product name: A name for you product, for example "teamspeak 3 plan 1"
Welcome email: welcome teamspeak 3
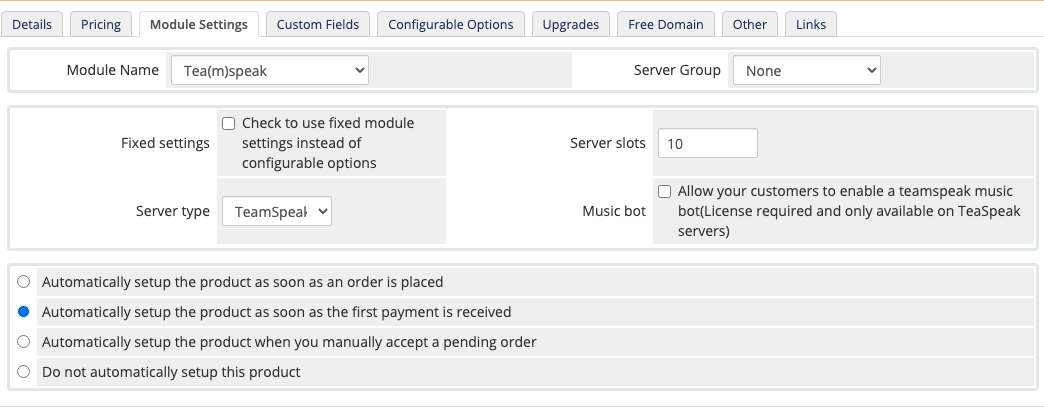
Module tab:
Module name: teamspeak 3
Server group: A server group in case you made server groups.
Fixed settings: If you want to use fixed product slots settings instead of configurable options or it is a product adddon, check it.
Servers slots: The fixed setting server slots.
Server type: Teamspeak/Teaspeak.
Music bot: Only supported if the server type is "Teaspeak". Teaspeak license required.
Check "Automatically setup the product as soon as the first payment is received"
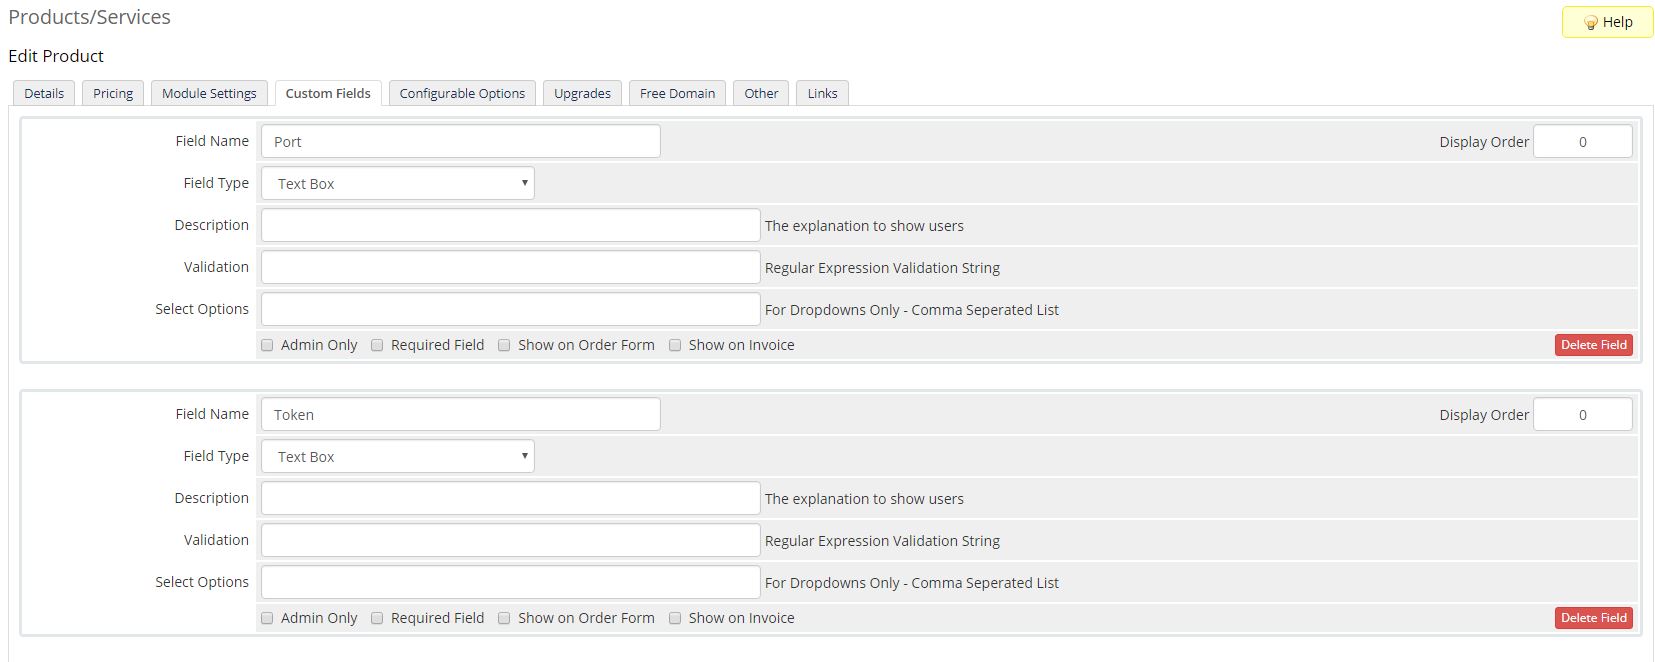
Add 2 text custom fields:
1- Port
2 - Token
IMPORTANT!!!!: DO NOT CHECK "admin only""Required field"/"Show on order form"/"Show on invoice"".
Save Changes
4) Create a Slots configurable option:
whmcs->setup->products/services->configurable options
Click "create new group" button
Group name : "Teamspeak 3"
Description: "Teamspeak 3"
In Assigned products select all your teamspeak 3 plans
Click "Add new configurable option" button Option
Name: "Slots" (Or the one you specified in the addon setting)
NOTE: its CASE SENSITIVE.
Option Type: Quantity
Add option: "1"
Click "save changes" button
Set the price for EACH slot.
Click "save changes" button.
TSDNS SUPPORT ( OPTIONAL )
Teamspeak 3 offer a TSDNS server to be able to connect with the teamspeaks using just a domain instead of the ip:port but unfortunately it does not offer any api and requires you to manually add each teamspeak 3 virtual server domain. To be able to offer automatic TSDNS support with our addon we developed our own open source TSDNS server free to download and modify for anyone at https://github.com/nathanrod/nodejs-tsdns , once installed (check https://cp.whmcsmod.com/knowledgebase/29/Tsdns-server-install-and-setup.html ) your teamspeak 3 services will automatically create a subdomain for each service).
Once the TSDNS is installed and running just follow these steps to enable it:
1. Check "Enable TSDNS" in the addon settings
2. Set "Tsdns domain" with your tsdns domain in the addon settings. The domain must point to your tsdns ip, for example if your domain is myts3.com and the client use the subdomain "test", he should be able to connect with his service with test.myts3.com.
3. Set the "Tsdns api url" in the addon settings. By default the tsdns api server use the port 3000, if your tsdns servrer ip is 1.2.3.4 then your api url must be http://1.2.3.4:3000
4. Set the "Tsdns api key" api key. It's the api key set in the TSDNS server config.
5. Add custom field named "Subdomain" to each one of your teamspeak 3 products and check the "required"/"show on order form" options.
5.1 Optional:
To support TSDNS multidomain, create a custom field named tsdns_domain , field type "dropdown" and the "select options" with the following sintax:
whmcsmod.com:192.168.1.1|whmcsmod.com,workinglikeamonkey.com:192.168.1.2|workinglikeamonkey.com
Where whmcsmod.com and workinglikeamonkey.com are examples of cloudflare domains and 192.168.1.1 / 192.168.1.2 each domain ip.
6. Add a A entry in your tsdns domain pointing to the tsdns server ip.
7. Add a SRV entry. For example if your tsdns domain is "myts3.com" the DNS entry must look like:
_tsdns._tcp.myts3.com 86400 IN SRV 5 0 41144 myts3.com
CLOUDFLARE.COM SUPPORT ( OPTIONAL )
1- Create an account at cloudflare.com ( if you don't have one already)
2- Create a "Global api key" in your account settings
3- Set "Tsdns domain" with your domain in the addon settings. If you want to offer subdomain for the domain "myts3.com", the value mut be myts3.com.
4- Add your domain in the cloudflare account
5- Check "Enable cloudflare" in the addon settings.
6- Fill the "cloudflare email/api key" field in the addon settings with the credentials provided by cloudflare.
7- Add custom field named "Subdomain" to each one of your teamspeak 3 products and check the "required"/"show on order form" options.
Every time a new service is created an A and a SRV entry will be created in your cloudflare dns zone. When a serivce is terminated those entries will be automatically removed.
Check https://docs.whmcsmod.com/index.php?title=Teamspeak3-cloudflare for additional info.
REGION SUPPORT ( OPTIONAL )
It is possible to display a region dropdown field in the order form to select the server region based on whmcs server groups.
For example if you have a server in London and another in California :
- Create a server group named "Teamspeak 3 London" ast SETUP->PRODUCTS->SERVERS
- Create a server group named "California" SETUP->PRODUCTS->SERVERS.
- Assign the whmcs teamspeak 3 server to each group.
- Create a product custom field named "region" :
- Check "required"
- Check "show on order form".
- Fill the "Select options" with the whmcs server group ids you want to display. If the "london" server group ID is 15 and the "California" server group id is 16 the value must be "15|London,16|California" . For custom field personalization check the "friendly custom fields" section at https://docs.whmcs.com/Custom_Fields .
ADMIN ADDON AREA
In this area you can manage your teamspeak 3 servers and virtual servers.
Manage: Display the list of virtual teamspeak 3 servers in the teamspeak 3 host.
Suspend: Stop the teamspeak 3 virtual server.
Unsuspend: Start the teamspeak 3 virtual server.
Delete: Delete the teamspeak 3 virtual server.
Groups: Manage the teamspeak 3 virtual server groups.
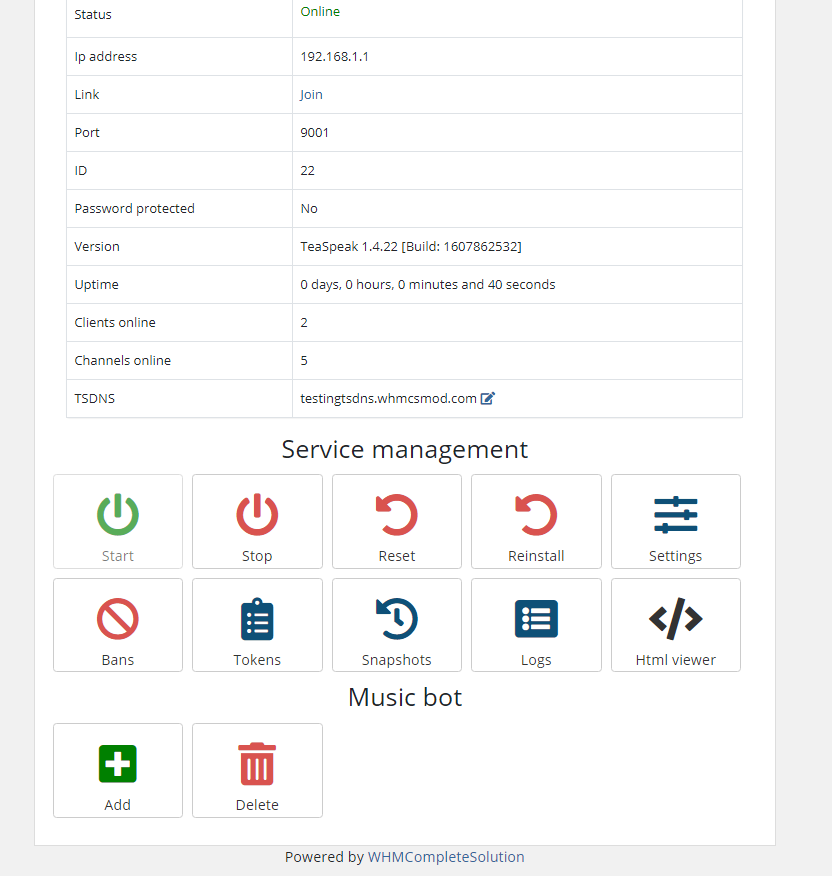
CLIENT AREA
Start: Start the teamspeak 3 server.
Stop : Stop the teamspeak 3 server.
Reset permission : Reset the teamspeak 3 server permissions to default.
Reinstall: Reinstall the teamspeak 3 server. All tokens, channels and groups will be lost.
Settings: Edit the teamspeak 3 server settings.
Bans: Manage the teamspeak 3 server ban list.
Tokens: Manage the teamspeak 3 server token list.
Snapshots: Make a teamspeak 3 server backup.
Logs: List the teamspeak 3 server logs.
Html viewer: Displays a HTML code widget to use in your client web pages.
Music Bot: Add/remove music bot from server(Teaspeak only).

